
A process map is a visual representation of the steps involved in a business process from start to finish. It can help you to understand, communicate, and improve your workflows, as well as identify potential problems or inefficiencies.
A swimlane diagram is a type of process map that divides the steps into different categories, or "swimlanes", based on who or what performs them. This way, you can easily see the roles and responsibilities of each actor in the process, as well as how they interact with each other.
In this blog post, we will show you how to create a process map with swimlanes for beginners using common software like Lucidchart, Figma, or Visio. I will also provide links to images and videos that explain the process in more detail.
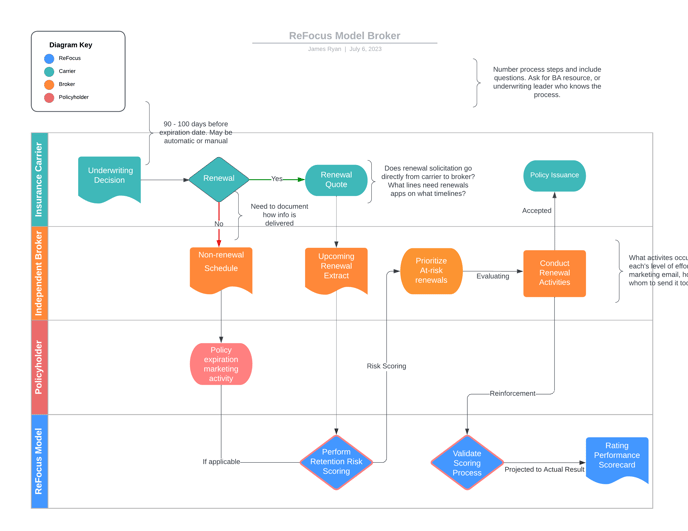
Here is an example of a process map with swimlanes created in Lucidchart:
You can also watch this video tutorial for more guidance:
A swimlane diagram is a type of process map that divides the steps into different categories, or "swimlanes", based on who or what performs them. This way, you can easily see the roles and responsibilities of each actor in the process, as well as how they interact with each other.
In this blog post, we will show you how to create a process map with swimlanes for beginners using common software like Lucidchart, Figma, or Visio. I will also provide links to images and videos that explain the process in more detail.
What You Need to Create a Process Map with Swimlanes
Before you start creating your process map with swimlanes, you need to have some information ready:- The name and purpose of the process you want to map
- The start and end points of the process
- The steps involved in the process and their sequence
- The actors or groups that perform each step
- The inputs and outputs of each step
- The rules or conditions that govern the flow of the process
How to Create a Process Map with Swimlanes in Lucidchart
Lucidchart is an online diagramming tool that allows you to create and share professional-looking process maps with swimlanes. Here are the steps to follow:- Sign up for a free Lucidchart account or log in if you already have one.
- Click on the "+" button on the left sidebar and select "New Document".
- Choose "Flowchart" from the template gallery and click on "Create".
- From the shapes library on the left, drag and drop a "Swimlane" shape onto the canvas. You can resize it by dragging its corners or edges.
- Double-click on the swimlane label bar to edit its name. You can also change its color, font, or alignment from the properties panel on the right.
- To add more swimlanes, click on the "+" buttons on the sides of the swimlane shape. You can also reorder them by dragging them up or down.
- To add steps to your swimlanes, drag and drop flowchart shapes from the library onto the canvas. You can choose different shapes to represent different types of steps, such as actions, decisions, or delays.
- To connect your steps, drag and drop connectors from the library onto the canvas. You can adjust their direction or style by dragging their handles or selecting them and using the properties panel.
- To label your steps or connectors, double-click on them and type your text. You can also change their color, font, or alignment from the properties panel.
- To add images or videos to your process map, click on the "Insert" tab on the top menu and select "Image" or "Video". You can then browse your computer or search online for the files you want to insert.
- To save your process map, click on the "File" tab on the top menu and select "Save". You can also export it as an image, PDF, or other formats by clicking on "Download As".
- To share your process map with others, click on the "Share" button on the top right corner and choose how you want to share it. You can invite people by email, generate a link, embed it on a website, or publish it online.
Here is an example of a process map with swimlanes created in Lucidchart:
You can also watch this video tutorial for more guidance:
If you already have a process diagram and you want to update it, check out this article.