
Use this article to learn how to:
- Invite new users
- Activate pending users
- Create custom roles
- Assign account visibility
- Manage AMS Assignee access
- Deactivate or delete users
- Troubleshoot common access questions
Who Can Manage Users and Roles?

Users with admin-type permissions will see Admin in the left navigation bar.
Go to: Admin → User Management
From there, you can manage users, roles, and join requests.
| Tab | Purpose |
|---|---|
| User Management | Invite users, assign roles, manage account visibility, deactivate users, or delete users |
| Join Requests | Review users who self-registered and are waiting for approval |
| Roles | Create and manage custom roles |
| Audit Logs | Coming soon |
💡Note: The Admin menu only appears for users whose role includes admin-type permissions, such as user management or role management.
Important Default Behavior
When Role-Based Access Control is activated for an existing organization, all current users are set as Admins by default.
This prevents users from accidentally losing access when the feature is turned on.
The first person who signs up for a new organization is also created as an Admin so they can complete setup for the organization.
After activation, organizational admins should review users and assign the correct roles based on each person’s responsibilities.
For new users going forward, the default role is User. Admins should choose the correct role when inviting or activating a user. If the right custom role has not been created yet, use the default User role temporarily and update the user later.
 Step 1: Create Custom Roles
Custom roles define what users can see and do in ReFocus.
To create a role:
- Go to Admin → User Management
- Open the Roles tab
- Select Create Role
- Enter a clear role name
- Choose the permissions for that role
- Save the role

How Permissions Work
Permissions may be controlled at two levels.
| Permission Type | What It Controls |
|---|---|
| Module-level permissions | Whether a user can access a feature area, such as Remarketing, Carriers, Billing, or User Management |
| Action-level permissions | What a user can do inside that area, such as view, create, edit, delete, run, configure, share, or export |
Not every module has the same action-level permissions. Actions are tailored to the specific functionality of that feature.
For example, one module may include View and Edit, while another may include Run, Share, or Configure.
Recommended Starter Roles
These are examples your organization may choose to create. They are not out-of-the-box roles and should be adjusted to match your organization’s workflow.
| Example Role | Typical Use |
|---|---|
| Administrator | Full access to users, settings, billing, integrations, carriers, and workflows |
| Producer / Agent | Access to accounts, policies, quotes, proposals, and remarketing workflows |
| CSR | Access to assigned accounts and renewal workflows |
| Remarketing Specialist | Access to remarketing and quoting workflows without admin settings |
| Billing / Operations | Access to billing or operational settings as needed |
| Read Only | View access without the ability to change settings or run workflows |
💡Best practice: Start with fewer roles. Add more only when different team members truly need different access.
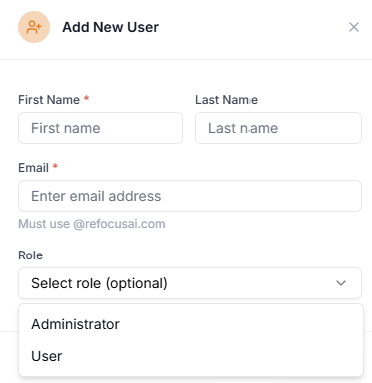
Step 2: Invite a New User
Organizational admins can invite users directly from ReFocus.
To invite a user:
- Go to Admin → User Management
- Select Invite User
- Enter the user’s information
- Choose the correct role
- Configure account visibility
- Send the invitation
The default role is User. If you have not created the correct custom role yet, use the default User role temporarily and update the user later.
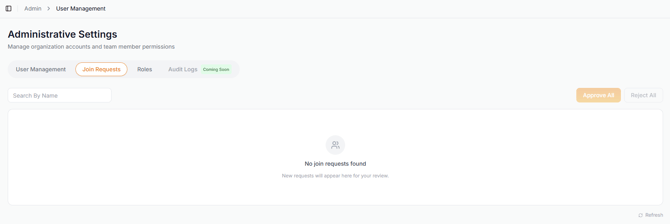
Step 3: Activate Pending Users
Users may also self-register using their organization email address.
When this happens, they do not automatically receive access to ReFocus. Instead, they appear under Join Requests as pending users.
To activate a pending user:
- Go to Admin → User Management
- Open the Join Requests tab
- Review the pending user
- Assign the correct role
- Configure account visibility
- Activate the user
The user will not have access until an admin assigns a role and activates the account.
Step 4: Set AMS Account and Policy Visibility
.png?width=670&height=111&name=mermaid-diagram%20(1).png)
Account visibility controls which accounts a user can see in ReFocus.
When assigning or editing a user, choose the appropriate account access.
| Account Access | What It Means |
|---|---|
| All Accounts | The user can see the organization’s full book of business, subject to their role permissions |
| Assigned Accounts Only | The user can only see accounts connected to the selected AMS Assignee(s) |
Using AMS Assignees
For users with Assigned Accounts Only, the AMS Assignee selection determines which accounts they can see.
This connects the ReFocus user to the correct user, role, or assignment in the organization’s AMS.
If one person needs access to accounts tied to more than one AMS assignment, select multiple AMS Assignees.
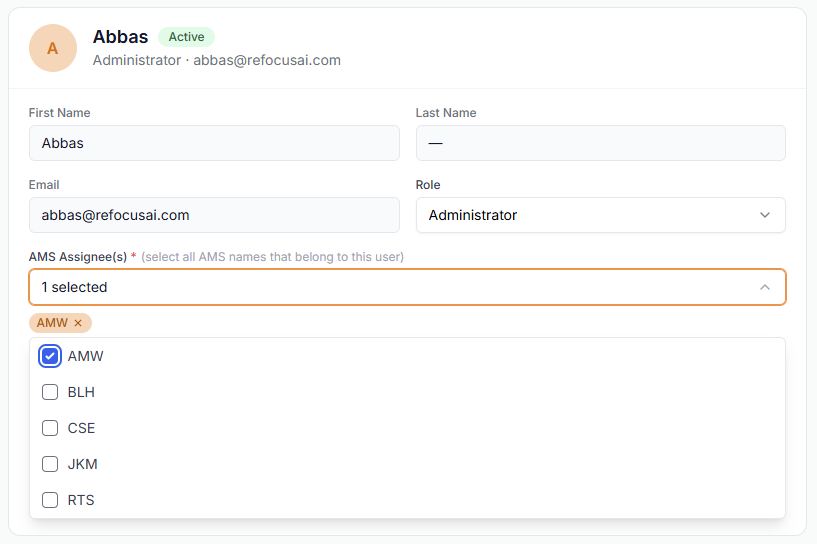
Example: A manager may need access to accounts assigned to multiple producers or CSRs. In that case, select each relevant AMS Assignee so the manager can see the correct combined book of business.
💡Best practice: Match each ReFocus user to the correct AMS Assignee(s) during setup. This helps ensure account visibility matches the organization’s AMS structure.
Step 5: Review and Test Access
After creating roles and assigning users, test access before rolling it out broadly.
Review:
- Does the user have the correct role?
- Can they see the correct accounts?
- Are admin-only areas hidden from non-admin users?
- Can they perform the actions they need?
- Are restricted actions properly unavailable?
If a user is already logged in when their access changes, ask them to refresh the page or log out and back in.
Managing Users
Edit a User: Use this when a user’s responsibilities change.
- Go to Admin → User Management
- Select the user
- Update their role, account visibility, or AMS Assignee(s)
- Save your changes
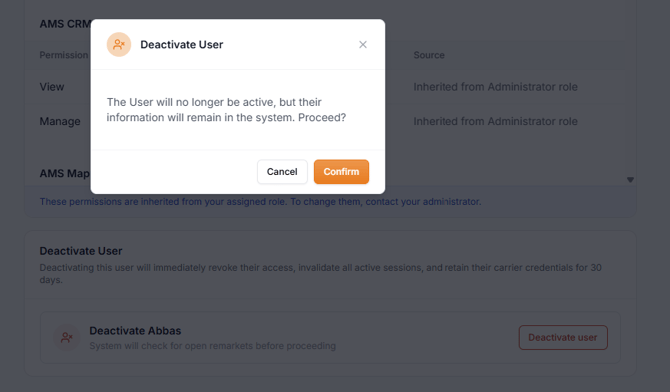
Deactivate a User: Use Deactivate when someone should temporarily lose access or may need access again later.
When a user is deactivated:
- They immediately lose access to ReFocus
- They can be reactivated later
- The admin is prompted to reassign open ReFocus items to another user
- Historical activity remains available
This helps ensure work is not left invisible or unassigned.
Delete a User: Use Delete only when the user should be permanently removed.
Deleting a user should be considered final and is best used when the person no longer works at the organization or will never need ReFocus access again.
FAQ & Troubleshooting
Why don’t I see the Admin menu?
The Admin menu only appears for users whose role includes admin-type permissions.
If you do not see Admin in the left navigation, ask another organizational admin to review your role permissions.
They should check whether your role includes access to areas such as:
- User Management
- Role Management
- Join Requests
- Other admin settings your organization wants you to manage
Why can’t a self-registered user access ReFocus?
Self-registered users do not receive access automatically.
When someone signs up using your organization email domain, they are placed under Join Requests as a pending user. An admin must review and activate the user before they can access ReFocus.
To activate them:
- Go to Admin → User Management
- Open Join Requests
- Select the pending user
- Assign the correct role
- Set account visibility
- Activate the user
Until this is completed, the user will not have access.
Why does a user see too many accounts and policyholders?
The user may have All Accounts visibility.
To limit their visibility:
- Go to Admin → User Management
- Select the user
- Change account visibility to Assigned Accounts Only
- Select the correct AMS Assignee(s)
- Save your changes
Ask the user to refresh the page or log out and back in.
Why can’t a user see accounts they should have access to?
Check whether the user is set to Assigned Accounts Only.
If they are, their visible accounts are based on the selected AMS Assignee(s).
Confirm that:
- The correct AMS Assignee is selected
- Multiple AMS Assignees are selected if the user needs access to multiple books
- The account is assigned correctly in your AMS
- The user has refreshed after the change
Why can a user see an account but not take action?
Account visibility and action permissions are separate.
A user may be able to view an account but not have permission to run a quote, start a remarket, edit information, share a proposal, or configure a setting.
To resolve this:
- Review the user’s assigned role
- Open the Roles tab
- Confirm the role includes the needed action-level permissions
- Update the role if appropriate
Why did a role change not update immediately?
Ask the user to refresh the page.
If they still see the wrong access, ask them to log out and back in.
Then review:
- Assigned role
- Account visibility
- AMS Assignee(s)
- Module-level permissions
- Action-level permissions
What should I do when a user leaves the organization?
Use Deactivate first.
When a user is deactivated:
- They immediately lose access to ReFocus
- You will be prompted to reassign open ReFocus items
- Their historical activity remains available
- They can be reactivated later if needed
Use Delete only when the person no longer works at the organization or will never need access again. Deleting a user should be considered final.
Why is the default User role available?
The default User role is available as a safe starting point when inviting or activating users.
Admins should assign the correct custom role whenever possible. If the right custom role has not been created yet, use the default User role temporarily, then update the user after the custom role is ready.
Can I create starter roles for common organizational positions?
Yes. Your organization can create custom roles for common workflows.
Examples may include:
| Example Role | Typical Use |
|---|---|
| Producer / Agent | Users who manage accounts, quotes, remarkets, and proposals |
| CSR | Users who work assigned accounts and renewal activity |
| Remarketing Specialist | Users focused on remarketing and quoting workflows |
| Billing / Operations | Users who need billing or operational access |
| Read Only | Users who should view information but not make changes |
These are examples only. They are not out-of-the-box roles and should be created and adjusted by your organizational admin.
What is the best way to test a new role?
Start with one user before applying the role broadly.
After assigning the role, confirm:
- The user sees the correct navigation items
- The user sees the correct accounts
- The user can complete the actions they need
- Admin-only areas are hidden when they should be
- Restricted actions are unavailable
After testing, apply the role to the rest of the appropriate users.
Best Practices
- Keep at least one active admin at all times
- Create custom roles before inviting a large group of users
- Use the default User role only as a temporary fallback
- Assign users to the correct AMS Assignee(s)
- Select multiple AMS Assignees when one user needs access to multiple books
- Test access with one or two users before updating the full organization
- Deactivate users before deleting them
- Review roles periodically as responsibilities change